Custom Dimensions and Metrics
Adding a custom dimension or metric is broken down into two steps. Step one is to set up the management interface. Step two is to use the analytics.js library to implement custom dimensions and metrics into your code snippet. Please note that you'll need to be a user with edit permissions. This is available for web and mobile properties using analytics.js and are not available for properties using ga.js.
For a complete reference on how custom dimensions and metrics work, read the feature reference from Google.
Creating A Custom Dimension in Universal Analytics
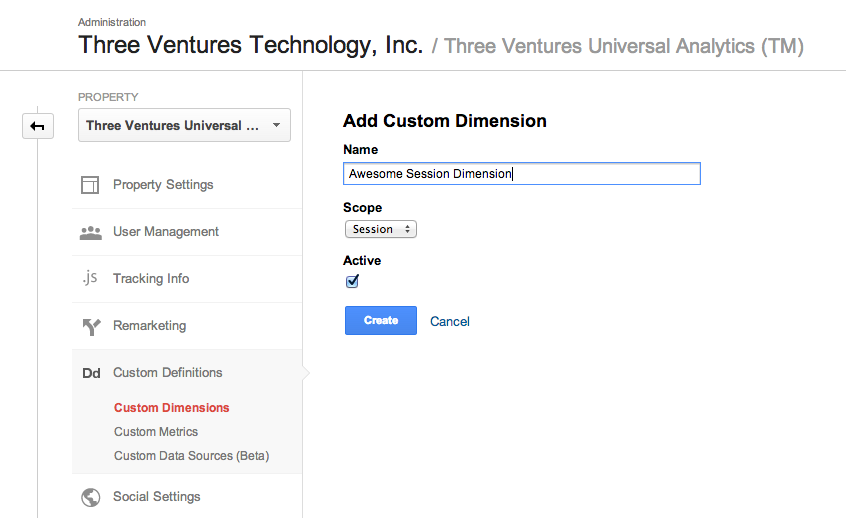
To create a custom dimension in Universal Analytics, follow the steps below:
- Once logged in, click the 'Admin' tab, then click the account name, and then the property the custom dimension is for.
- Now click 'Custom Definitions', and then choose the 'Custom Dimensions' tab.
- Click on the 'New Custom Dimension' button
- Now name your dimension. It can be any string, but keep it simple and unique. This will help minimize confusion with other custom dimensions or metrics.
- Select the scope. Now choose the level you what to track at. Levels are Hit, Session, or Visitor. Read more about scope and dimension processing on Google's Developer Guide.
- Don't forget to check the 'Active' box to start data collection. This will allow you to see the dimensions in your reports almost instantly. You can also create a dimension and make it inactive until needed.
- Hit the 'Create' button.

Remember, custom dimensions can't be deleted, only edited. To stop an existing dimension, just uncheck the 'Active' box. For step two, you'll need the unique index that is assigned to your custom dimension. This index identifies and distinguishes one custom dimension from another.
Creating A Custom Metric in Universal Analytics
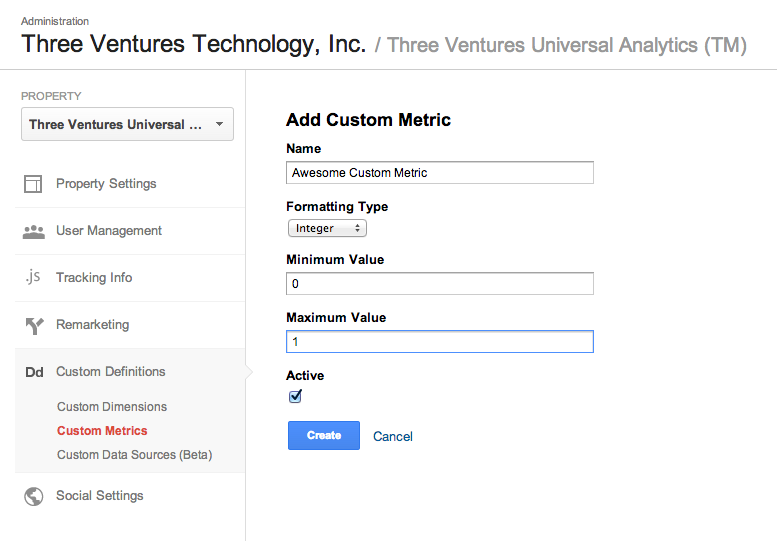
To create a custom metric in Universal Analytics, follow the steps below:
- Log in to your Analytics account and go to the property you wish to add the metric to.
- Now click 'Custom Definitions', and then choose the 'Custom Metrics' tab.
- Click on the 'New Custom Metric' button.
- Now name your dimension. It can be any string, but keep it simple and unique. This will help minimize confusion with other custom dimensions or metrics.
- Select the formatting type. The formatting type can be an Integer, Currency, or Time. For integers, use any number. For currency type, use a decimal number (The currency type will match the profile settings). For time, specify in seconds. In reporting, time appears as HH:MM:SS.
- Don't forget to check the 'Active' box to start data collection. This will allow you to see the dimensions in your reports almost instantly. You can also create a dimension and make it inactive until needed.
- Hit the 'Create' button.

Remember, custom metrics can't be deleted, only edited. To stop an existing metric, just uncheck the 'Active' box. For step two, you'll need the unique index that is assigned to your custom metric. This index identifies and distinguishes one custom metric from another.
Sending Custom Dimension or Metric Data
To send custom dimension or metric data, we have to use the analytics.js library. To send the data for either, we have to use an existing hit type.
For example, to send a custom metric using an event hit type with the unique index of 12, you would use:
ga('send', 'event', 'category', 'action', { 'metric12': 3500 });
To send a custom dimension with the pageview hit type and a unique index of 16, you can use:
ga('send', 'pageview', { 'dimension16': 'dimension name' });
Now what if you had a custom metric defined as a currency type? You can use:
ga('send', 'event', 'category', 'action', { 'metric11': 79.99 });
To send a dimension or metric for all the hits on a page, you would use the set command. For example:
ga('set', 'dimension16', 'dimension data');
You can also set values for metrics and dimensions using a data field with the set command. For example:
ga('set', { 'dimension16': 'dimension data', 'metric11': 'metric data' });
I encourage all of you who plan on using the data field to read the dimensions and metrics section of the Field Reference document for the proper formatting of sending such data.
Using Variables To Pass Values
Many of us engineers and developers are most likely going to need to use variables to pass values. All you need to do is define the variable when sending the dimension or metric. For example, if your page is written in PHP, you could use the following for a dimension value:
ga('send', 'pageview', { 'dimension16': '< ?=$variable?>' });
Keep in mind, dimensions use strings as a value and metrics use a number. When populating a value for a metric using a variable, the variable must be a number and not a string.
We would love to hear your feedback! Feel free to ask questions, talk about your uses of custom dimensions / metrics, or leave comments below.
Need help creating or implementing custom dimensions or metrics? How about implementing Google Tag Manager? Feel free to contact our Google Analytics Consultants for all of your GA needs.
Need help optimizing your website or marketing machine? Get in touch with us.


