


Introduction
This post offers a cost-effective blueprint for deploying Apache Airflow for small to medium workloads, an alternative to pricier solutions like Astronomer. It's tailored for those familiar with AWS, CloudFormation, Airflow, and related DevOps concepts. If that's not you, share this guide with your tech team or reach out to Three Ventures for professional help.
Ensure our solution's assumptions align with your needs before deployment:
- An environment can be made available in AWS for these resources.
- You’re using GitHub to manage source code.
This article details an automated method for deploying Airflow on AWS, allowing for consistent multi-environment setups (dev, stage, production). The focus is on Airflow's core architecture components (Redis, PostgreSQL, Scheduler, Worker, Web) and its service features, such as connections and DAGs. We've shared a public repository with code for a standard Airflow setup, influenced by the Airflow Autoscaling ECS repository, but with enhanced security and added utilities.
The Production Problem
Airflow's local setup is straightforward, but production deployment, especially outside Kubernetes, is more complex. Most online solutions are incomplete or focus on Airflow v1, despite v2 being the latest version.
Airflow can get costly based on DAG configurations and runtimes. We've developed a method for cost-effective, consistent production deployments using AWS Fargate.
The Production Solution
We utilized CloudFormation for a turnkey solution to deploy consistent Airflow environments in AWS, ensuring identical infrastructure across production, staging, and development. Rather than adding external tools like Terraform or Pulumi, we chose CloudFormation, AWS's native IaC solution. The AirFlow Stack handles everything from initial setup to DAG updates through an integrated CI pipeline. Refer to the architecture diagrams below for a snapshot of the Airflow application layers.
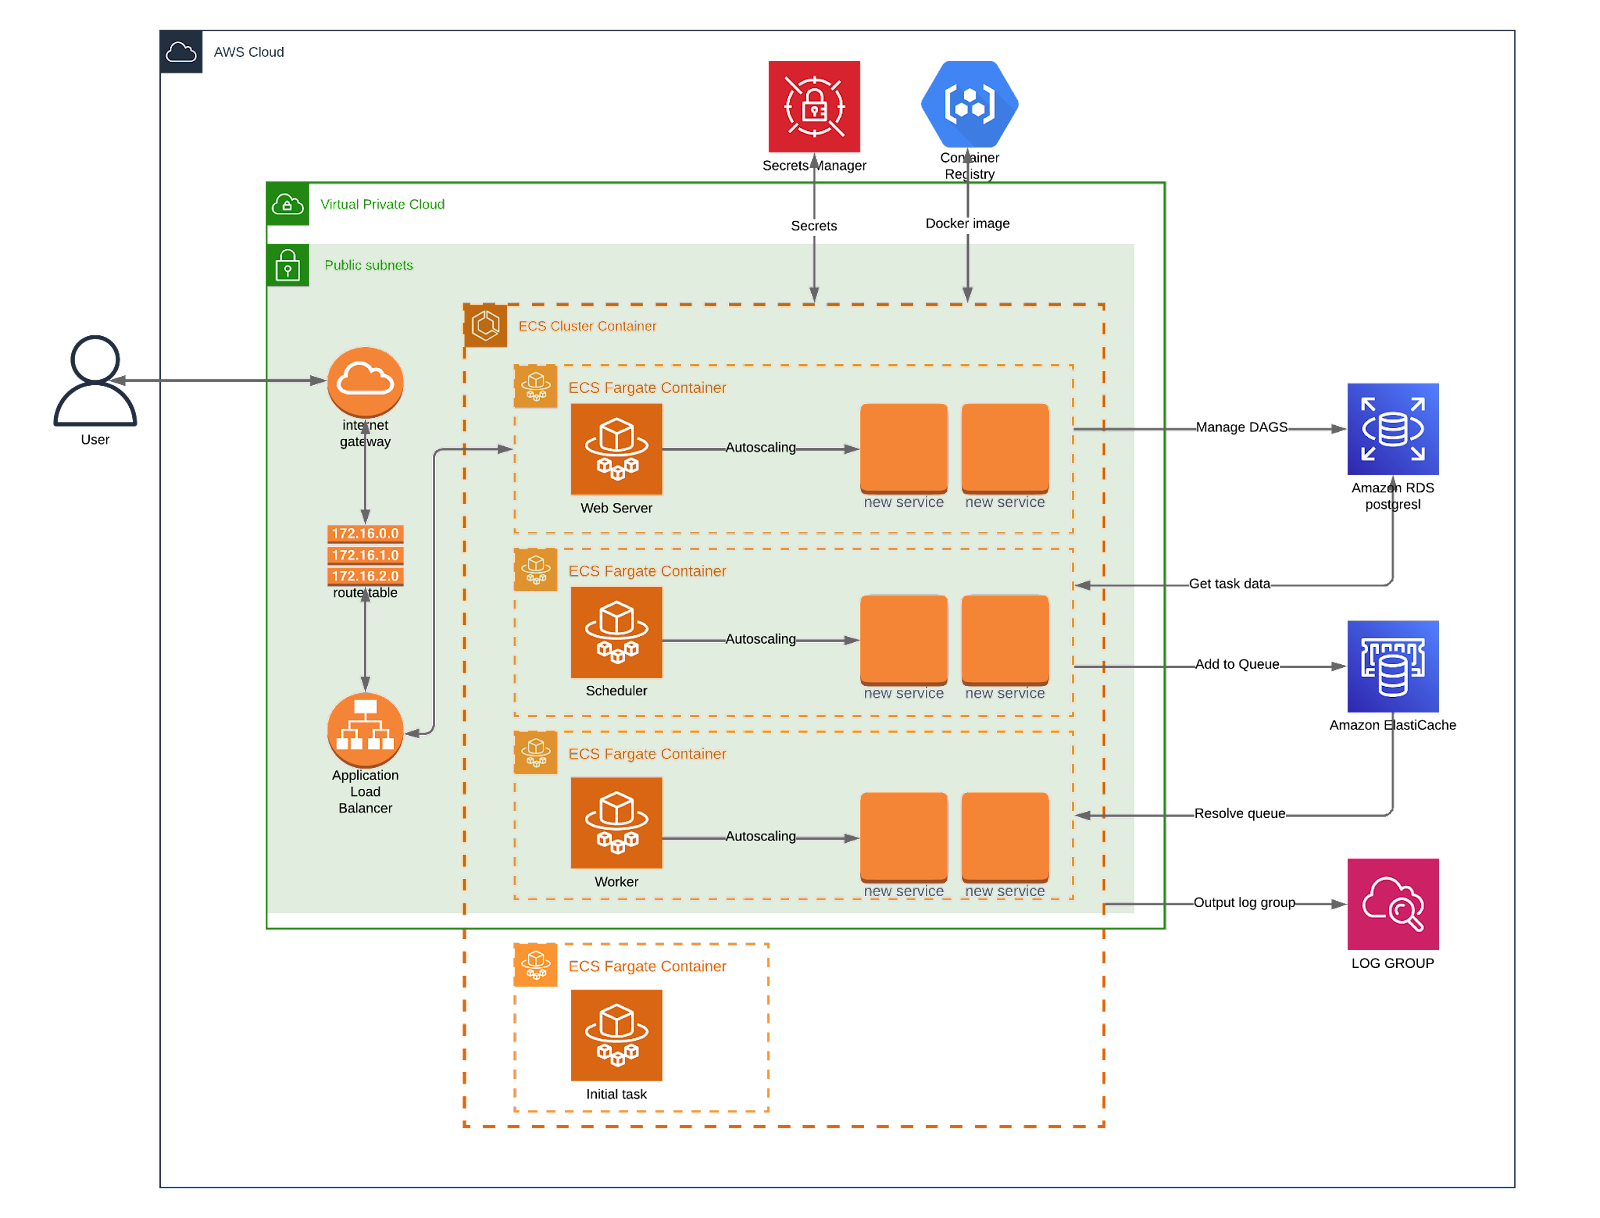
Using CloudFormation, we've integrated a CodePipeline for automatic DAG updates. Committing code to a specific branch triggers an automatic release to your Airflow environment. The CloudFormation YAML files detail:
- Source: Triggers the pipeline upon branch changes matching the environment name.
- Build: Executes configurations in the buildspec file, which is where any CI/CD customizations would occur. You can learn more about buildspec files for CodePipeline using the AWS documentation.
A separate diagram is provided to depict the CI/CD configuration, as it's managed alongside the main infrastructure.
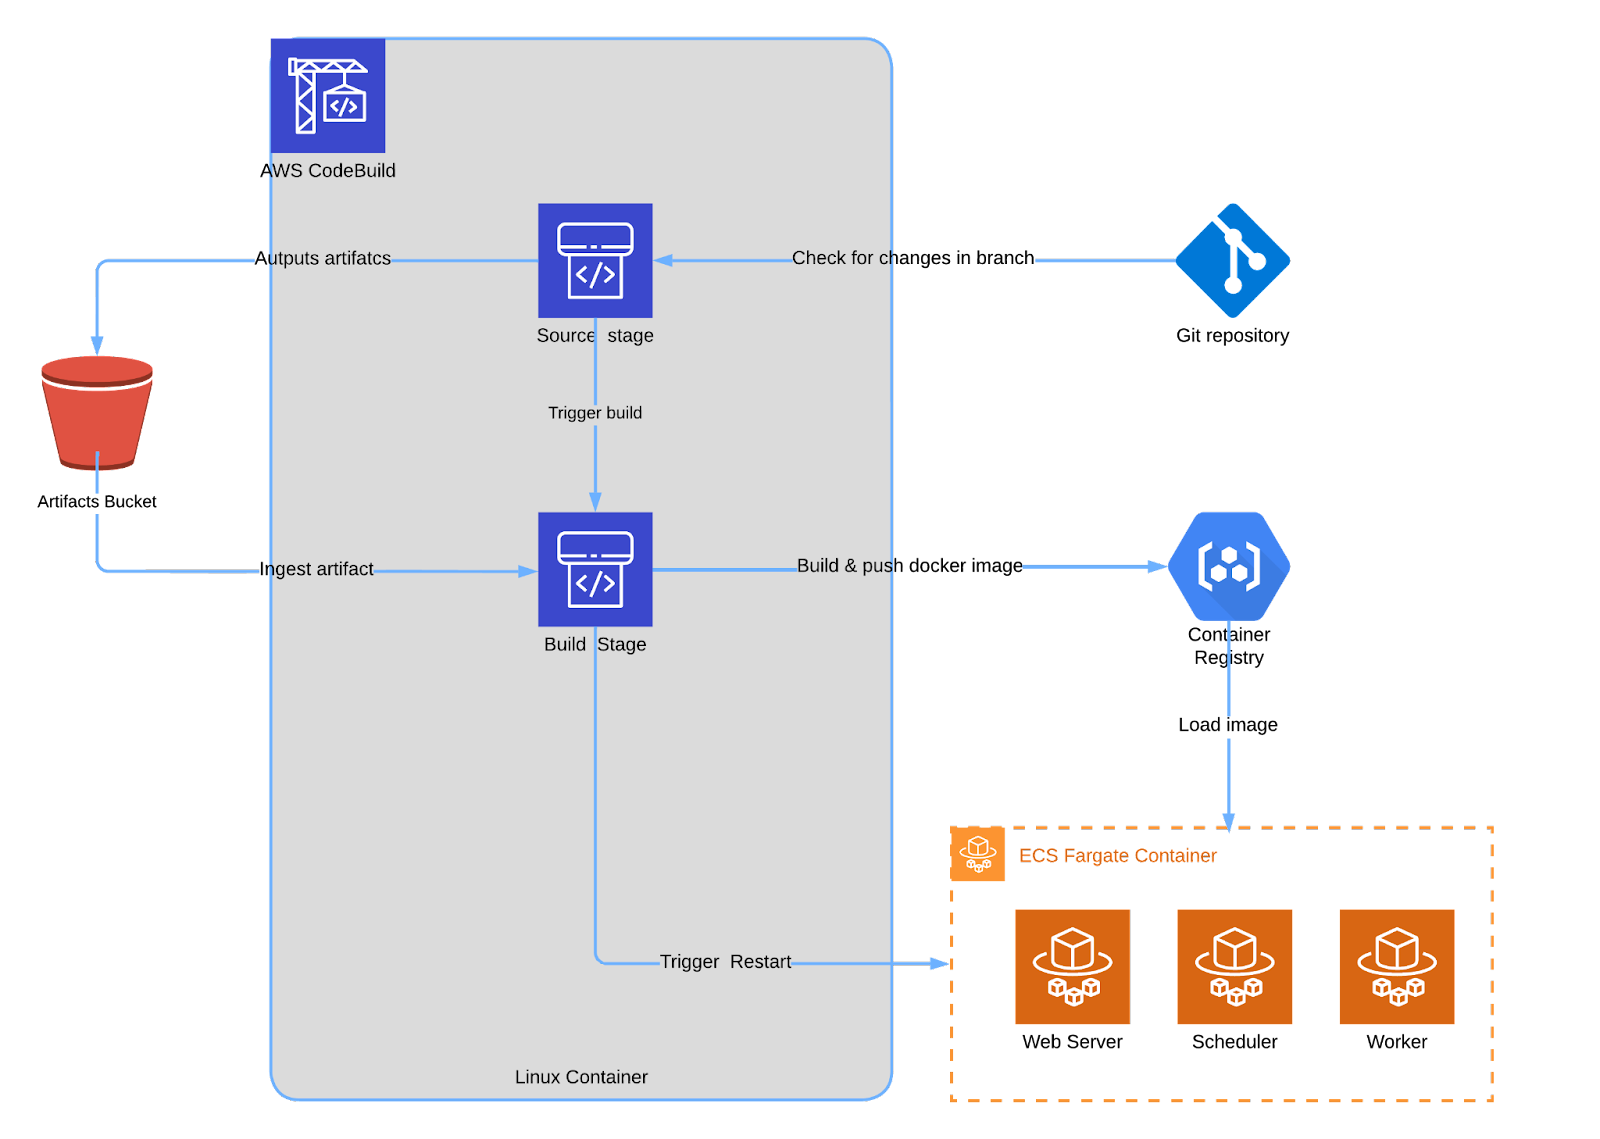
CodePipeline auto-updates and restarts the application with new images. Based on our tests, this can take about five minutes, so changes may not reflect instantly!
Preparing Your Machine
To deploy Airflow, you'll first need Docker and Python up-to-date on your machine. Installation varies based on your OS, so we won't detail it here. Once set up, proceed to the next steps.
Python Libraries
After installing the mentioned programs, begin configuring the libraries and settings for our repository. The subsequent commands will set up the AWS CLI and essential libraries for the utility scripts.
pip install awscli
virtualenv venv
source venv/bin/activate
pip install -r requirements.txt
Preparing For Deployments
Several cloud services must be set up or updated prior to starting any deployment.
IAM Authentication (Required)
First, create or use an existing IAM user with CLI permissions for deployment. An example IAM Policy is provided in the repository with the file /airflow.cli-user.policy.json . This IAM Policy is very permissive, so use caution when providing access. Next, setup your AWS CLI to use the credentials associated with the IAM user. You can create a custom profile in ~/.aws/config (example below) or run aws configure in a terminal. Multiple authentication methods exist with the CLI so please pick what aligns with your company's access policy.
[profile airflow]
aws_access_key_id = <id>
aws_secret_access_key = <key>
region = us-east-1
Continuous Integration (Required)
For continuous integration via GitHub, first create a dedicated branch in your repository, ensuring only updates to this branch initiate environment changes. Then, establish a connection in CodeStar, granting CodePipeline the necessary access to the repository.
SSL Certificate (Optional)
For HTTPS, generate a certificate with ACM and add its ARN to your service.yml file. After deploying the stack, create a DNS record targeting the new load balancer. Ensure the certificate aligns with the DNS record you intend on creating.
Configuration Files
The CloudFormation stack relies on a configuration file to build environments. We've provided a service.yml file as a starting point. Review it thoroughly and decide on potential changes. Each environment will have it's own configuration within the service.yml file. To get started, you must modify certain settings in the configuration file; otherwise, the CloudFormation stack won't deploy. The following keys must be updated:
- serviceName
- owner
- www
- github
For CI/CD with CodePipeline, each environment requires a buildspec file. We offer a default buildspec file that can be used as a starting point. Each buildspec file must match the naming convention buildspec.environment.yaml. An example for a branch stage would be buildspec.stage.yaml.
Managing Environments
After setting up your local machine and configuring AWS assets, you're ready to deploy using the CloudFormation stack.
CloudFormation doesn't store a stack's status in your files. Stack configuration relies on environment variables being set in your current shell. Before executing any commands, always set the proper shell variables since our CloudFormation commands depend on them. The ENVIRONMENT variable is what differentiates between environments.
# set environment variables when applicable
export AWS_REGION=us-east-1
export AWS_PROFILE=default
export ENVIRONMENT=default
Initial Deployment Per Environment
To deploy your environment for the first time, use the following command:
# Initialize the Environment
make airflow-init
The initial deployment requires numerous resources, typically taking about 30 minutes to set up. Even after the terminal indicates completion, the web interface may take a few extra minutes to become accessible via a browser.
Accessing Airflow
To access the interface, find the AirflowWebServerEndpoint value in your terminal.
"cfn-airflow-webserver": [
    {
        "OutputKey": "AirflowWebServerEndpoint",
        "OutputValue": "airflow-dev-webserver-alb-1234567890.us-east-1.elb.amazonaws.com"
    }
]Use the AirflowWebServerEndpoint to create your DNS records in Route53.
The password and username for the Airflow service can be set in your configuration file under the wwwAdmin and wwwPassword keys.
Multiple Deployments
It’s possible to have multiple configurations for different environments. If you look at the service.yml file, you will find out that the tree starts with a default key. That is the setting that the app will always default to if it does not find a configuration with the same name as the environment shell variable (ENVIRONMENT). If you wish to set your own config, copy and paste the default config to the bottom of the file and change default key to match your environment name. Modify the configurations under your environment name to be specific to your needs.
Adding DAGs
Eventually you’ll need to add your own DAGs, and you can do so by adding your DAG files to the /dags directory. We recognize that some DAGs might require other changes, such as configuring a connection or adding an environment variable. We’ve given you a way to do this using the extra_commands.sh file. Just add your bash commands there and update your environment. Any shell commands in the file will be run against your environment with the following command.
# Run Commands From extra_commands.sh Script
make airflow-run-commands
Other Commands
We've provided additional commands for managing environments. Just like deployment commands, they require the correct shell variables. Ensure your terminal is set up properly before executing them. See the makefile for all commands.
# Update the Environment
make airflow-deploy

# Update Environment Variables Only
make airflow-update-stack

# Push a New Image and Restart the Container
make airflow-push-image
Release Automation
Once Airflow is deployed, the continuous integration infrastructure should function. Pushing changes to the designated GitHub branch initiates a code update, rebuilds the Docker image, and deploys your code. After the pipeline completes and the containers are in Fargate, your updates will be live in the environment.
Destroying Your Environment
We've added a command to dismantle your environment. This takes time, so consider it a coffee break. The beauty of infrastructure as code is it runs in the background so you can focus on other priorities!
# Destroy an Environment
make airflow-destroy
Updating the environment
We've updated the Python package versions for Airflow and its dependencies. If you're creating a new environment using the blueprint from our repository, there's no action required — the updated versions will be applied automatically. However, if you want to update an existing environment, simply modify the requirements.txt file (you can refer to the updated versions in our repository) and run the command:
make airflow-push-imageRemember to set the correct shell variables in your terminal before executing this command, as is required for all make commands in the Makefile.
Important: Updating an existing environment may require changes to your DAGs. Be sure to test your setup locally before deploying, as failure to do so could result in broken DAGs in production.
Closing Thoughts
We aimed to provide a foundation that can be used as a baseline for production installs of Apache AirFlow to those looking to be cost conscious. There are a couple of options provided by AWS, like Managed Workflow for Apache AirFlow, or services like Astronomer, but those tend to come with higher price tags. So we’ve released this CloudFormation stack as a way for those with technical skills and limited budgets to get something as turnkey as possible.
If you’re looking for AWS experts to help you or your teams with a project, feel free to reach out to us. We’re an AWS Consulting Partner after all!